How to Blink an LED using PIC16F877A and MPLAB X IDE
💡 How to Blink an LED using PIC16F877A and MPLAB X IDE
If you're getting started with PIC microcontrollers, blinking an LED is the classic "Hello World" project. In this guide, we’ll show you how to blink an LED using a PIC16F877A microcontroller and MPLAB X IDE with the XC8 compiler.
This step-by-step tutorial is perfect for beginners looking to learn the basics of embedded programming with PIC.
🔌 What You'll Learn
- ⚡ Setting up MPLAB X with XC8 Compiler
- 💻 Writing simple code to blink an LED
- 🧪 Simulating or programming your hardware
Let’s begin!
🧰 Prerequisites
- MPLAB X IDE installed
- XC8 Compiler installed
- A PIC16F877A microcontroller
- An LED and a 330Ω resistor
- Breadboard and jumper wires
- Optional: PIC programmer like Pickit 3/4
🛠️ Step 1: Create a New MPLAB X Project
- Open
MPLAB X IDE - Go to File > New Project
- Select Microchip Embedded > Standalone Project
- Choose PIC16F877A from the device list
- Select your preferred tool (Pickit 3, for example)
- Choose XC8 as the compiler
- Set a project name and click Finish
💡 Step 2: Write the Blink Code
Replace the contents of main.c with the following:
#include <xc.h>
#define _XTAL_FREQ 20000000  // 20MHz external crystal

void main(void) {
    TRISB0 = 0; // Set RB0 as output
    while(1) {
        RB0 = 1; // Turn LED on
        __delay_ms(500);
        RB0 = 0; // Turn LED off
        __delay_ms(500);
    }
}
This code toggles pin RB0 high and low every 500 milliseconds, which will blink the LED.
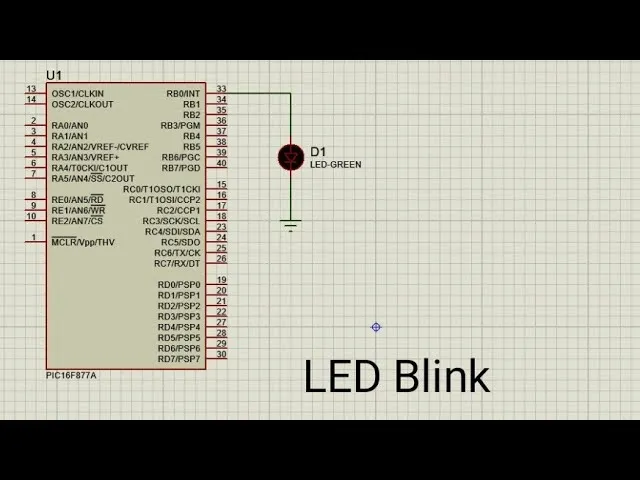
🔗 Step 3: Connect the LED
- Connect RB0 (pin 33 on PIC16F877A) to one leg of the 330Ω resistor
- Connect the other end of the resistor to the anode of the LED
- Connect the cathode of the LED to GND
Make sure the PIC is powered and grounded properly.
📤 Step 4: Build and Upload the Code
- Click the Clean and Build Project icon
- If successful, click Make and Program Device
- Watch your LED start blinking! 🚨
📈 Bonus: Adjust Blink Speed
Change the delay value to speed up or slow down the blink:
__delay_ms(100);  // Faster blink
__delay_ms(1000); // Slower blink
🎉 Conclusion
Congrats! You've completed your first embedded project using a PIC microcontroller. Blinking an LED might seem simple, but it's a foundational step that opens the door to more advanced electronics projects like sensors, motors, and communication modules.
Have questions or need help? Leave a comment below! 💬
Keep experimenting and happy coding! 🚀🔧


Comments (1)
Leave a Comment